Add the “Add picture control” to a screen and set the AddMediaButton component to add the photo and a random filename to a collection.

ClearCollect(colPics, {Pic:UploadedImage1.Image,Name:Rand() &”.png”})
2. Add a button to the screen and create a flow from it using the Action menu.

3. In the freshly minted flow, add a Parse JSON action, and in the content textbox, choose Ask in PowerApps from the data panel and add the following schema…
{
“type”: “array”,
“items”: {
“type”: “object”,
“properties”: {
“Name”: {
“type”: “string”
},
“Pic”: {
“type”: “string”
}
},
“required”: [
“Name”,
“Pic”
]
}
}
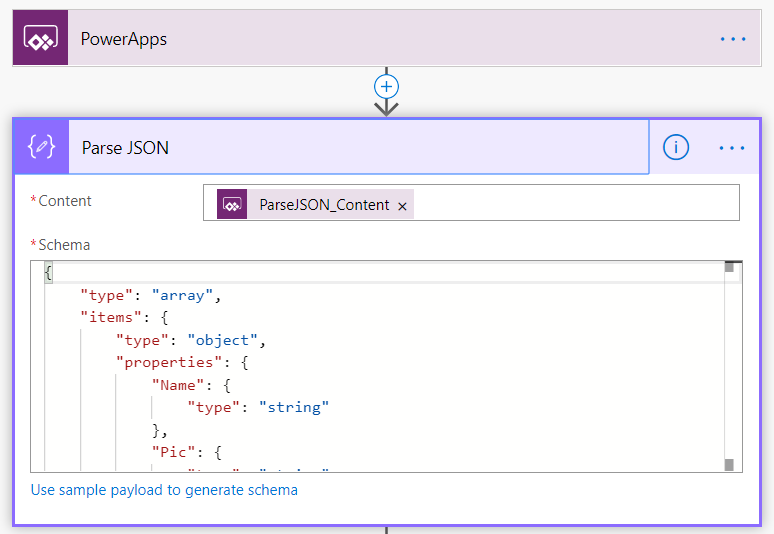
For Schema, just paste the above json content.
4. Add a Create File action from SharePoint or OneDrive. In this case I will use SharePoint. From the data panel, set the File Name to Name from the Parse JSON action output. Since this is an array of files, Flow will wrap this action inside an Apply to Each action.

5. For the file content action, add an expression as follows:
decodeDataUri(item()['Pic'])
This expression is basically saying “for the selected array of photos, grab the Pic content and turn it back into binary

6. Save the flow and go back to your PowerApps. Choose the button “Save Pic to SP” again and link to your newly created Flow via the action menu.

7. Complete the expression on the button as follows…
Set(stuff, JSON(colPics,JSONFormat.IncludeBinaryData));SaveAddMediaFromPA.Run(stuff)
This is the bit that is converting your photo collection to a form that can be easily sent to Flow…
7. Finally, take some pics and click your button… if all goes to plan, you will see your photos in SharePoint or OneDrive…

Copied from : http://www.cleverworkarounds.com/2019/06/08/getting-pics-to-sharepoint-from-powerapps-is-getting-easier/
Thanks to : CLEVERWORKAROUNDS